Your Patient Pages contain several areas that you can customize from the Websites section of your Member Dashboard. You can add custom messages, control what financial information is displayed, and add questions to your surveys.
Messages
On the Messages page, you can add a customized message to any, or all, of your Patient Pages. Using the drop-down menu, you can choose the page on which your message will display. Once you’ve selected the correct page, enter your message in the box.
You can also choose a date when your message will expire using the “Remove this message on:” check box and date field. This allows you to display a message that will be automatically removed after a given date.
To view the current default message showing on a patient's page, please use the Mimic Patient Pages option on a patient account and click through the individual pages.
When using the "All Tabs" option remember that any messages listed on the individual pages will override this message.
When you are finished creating your message, be sure to click the Save button.
Financial
The Financial page allows you to modify what financial information will be available to your patients. You can also update the provider information as it is displayed on their printed statements and receipts. From this page you can choose any of the following options:
- Disable payments and charges information - Disables the breakdown of payments and charges shown beneath a patient’s payment information
- Disable insurance information - Disables insurance line items and insurance benefit information from showing in a patient’s Payments and Charges
- Disable flex spending information - Disables the Flex Spending Info box that appears on the lower right corner of the page
Disabling both “payments and charges information” and “insurance information” options will remove the Financial Info tab from your Patient Pages.
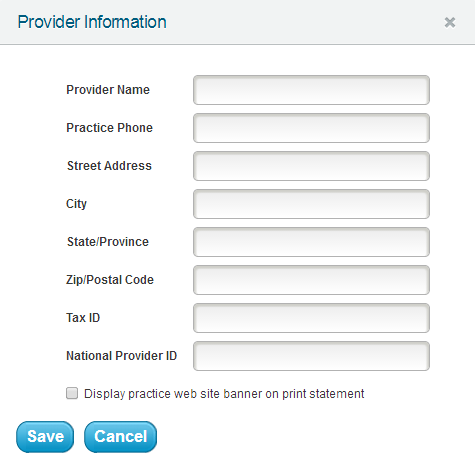
To add optional provider information that will appear on statements and receipts that patients print from their Patient Pages, click on the Add button. This will open a new window where you can add the desired provider information. The check box at the bottom of this window allows you to display your website banner on the printed statement.
When you are finished with your changes, be sure to click the Save button.

Feedback
Using the Feedback page, you can add up to five additional questions to your standard Website and Post-Appointment Feedback surveys. The drop-down menu at the top of the page can be used to select the survey you wish to edit. Once you have chosen the correct survey, simply add your additional questions in the field provided.

The custom questions added from this page do not use the same star-rating system of your default survey questions. Your patients will have the ability to type their response to each of these questions. These responses will be visible to you when the surveys are submitted, but will not appear in your Healthgrades Enhanced Profile.
When you are finished adding your new questions, be sure to click the Save button.
Settings
Under Appointments, you can choose to hide the appointment duration. This typically displays on the Appointments tab of the Patient Pages on any upcoming and past appointments. Click the Save button at the bottom of the screen to complete.
Under Patient Images, you have the option to hide all or specific images from patients, as long as you have a compatible imaging service that we are linked to. If you do not want any patient images visible, click "Hide all images in patient pages". If you would like to hide certain types of images, click on the image type in the left hand column under "Order of Visible Images", then the Hide button at the bottom. It should then show in the right hand column under "Images Hidden From Patient". Click the Save button once the list is updated.
 Looking for more information? Check out these Related Pages!
Contact our Member Services team at 866-537-8272, Monday - Friday 6 AM to 4 PM Pacific Time.


